Over the past few years, security industry experts have been warning that the internet of things (IoT) is wildly insecure. In recent weeks this has come to fruition, first with a DDoS against krebsonsecurity.com and later with a DDoS against Dyn’s name servers. It was the sign I needed to finally make the move from thinking about improvements to my home network to actually building it out. I wanted to fully isolate and lock down everything IoT or otherwise untrusted.
When we built this house, I had the opportunity to put in the physical infrastructure I wanted: at least two Cat 5e + RG-6 runs to every room with extra to the room that would eventually be my office. All of the terminations for these were centralized into a closet at the center of the house, which houses a small patch panel, an unmanaged switch, and an AirPort Time Capsule providing routing services.
This setup worked fine for a while, but as the years have passed, my fleet of devices has grown as have the demands on the network. What was once a couple computers and a printer now encompasses multiple computers, printers, security cameras, iPads, iPhones, and several other network-dependent devices. In addition to that, more residents in this neighborhood have set up wireless access points of their own, and the congestion from those had begun to impact the dependability of my own. It’s not uncommon to see an SSID list with 25-30 entries.
Given these new considerations, I had a list of things I wanted:
- Support for at least three distinct networks (VLANs) on the same set of hardware.
- Distinct 5 GHz and 2.4 GHz SSIDs for the wireless to help with the interference problem (I would have done away with 2.4 GHz entirely, but certain devices I have only support that frequency range).
- Firewall controls to block or allow access from one VLAN to another as desired.
- QoS controls.
- Static DHCP entries.
I ultimately settled on two new pieces of hardware: a Ubiquiti EdgeRouter PoE and a Netgear R7000. I would continue using my existing 24-port unmanaged switch and switch the AirPort Time Capsule to be a Time Capsule only.
I do not wholly recommend these though — there were some configuration issues with the Netgear R7000 + DD-WRT that I could not anticipate ahead of time that would have changed my mind had I known. My revised choices are a Ubiquiti EdgeRouter Lite (essentially a 3-port version of the PoE model), 16-port EdgeSwitch Lite, and a UniFi AP AC PRO. Ubiquiti makes quality equipment, and I would have benefitted from a common vendor and interface.
The Plan
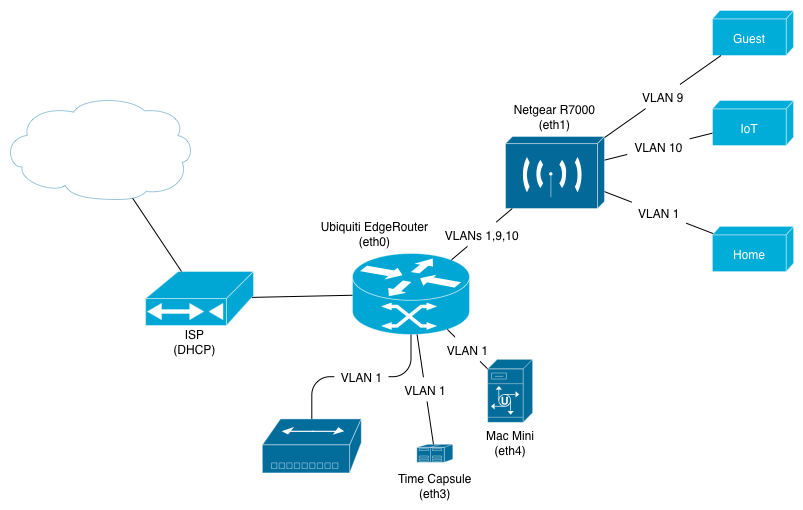
The EdgeRouter would sit at the edge of the networks, handling the DHCP servers, NAT, firewall, DNS relaying, and (obviously) routing. The R7000 would act as an access point, tagging each SSID with the appropriate VLAN number.
Implementation
Getting everything up and running was not a smooth process. The Ubiquiti side of things went pretty well, but I ran into some buggy behavior on the DD-WRT side (the standard access point behaviors work great — it’s the more advanced features that have spotty support). These are the steps I went through. Your own setup may be different, but my hope is that by explaining some of the snags I encountered it can save a bit of time searching around.
Netgear R7000
I started with the R7000. Netgear’s stock firmware is incapable of doing anything with VLANs unless the device is in router mode, so I flashed it to DD-WRT (this was somewhat hard to find since it’s not on the official site — it can be found http://desipro.de/ddwrt/K3-AC-Arm/).
A warning first: it’s very easy to lock yourself out of the configuration interface by putting the settings in a non-routable state. This requires doing reset-to-defaults, which is done by holding the reset button on the back until the indicator lights are fully dimmed (about 10 seconds). Once it reboots, it will have the default DD-WRT settings, so I recommend saving a configuration backup every time a stable state is reached to avoid having to redo everything.
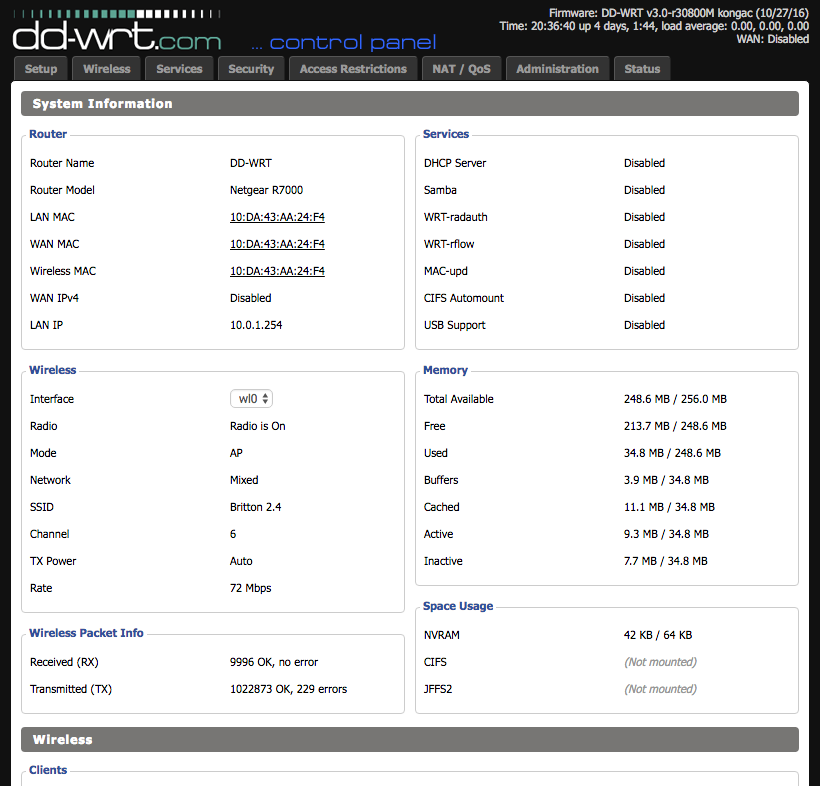
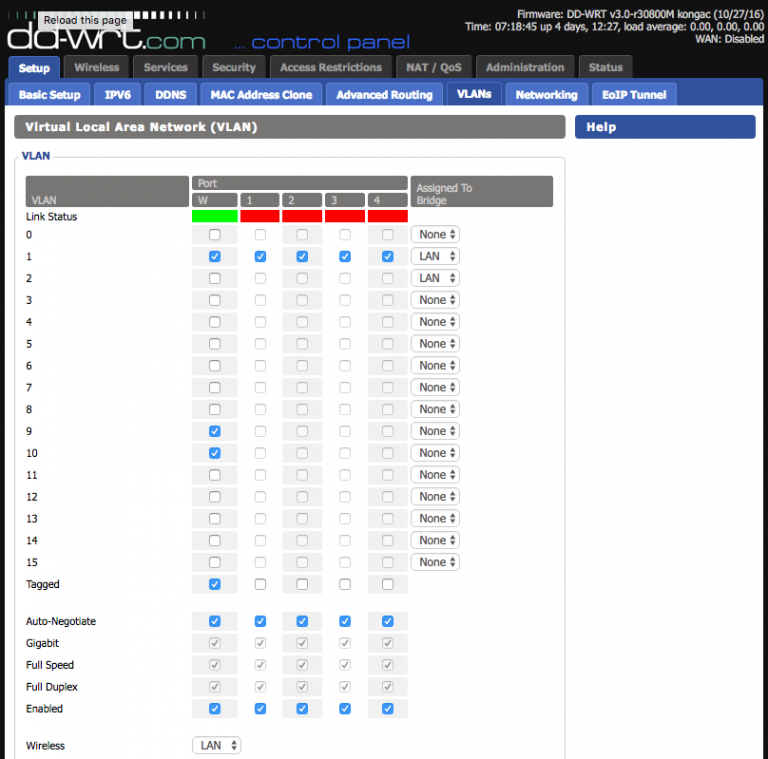
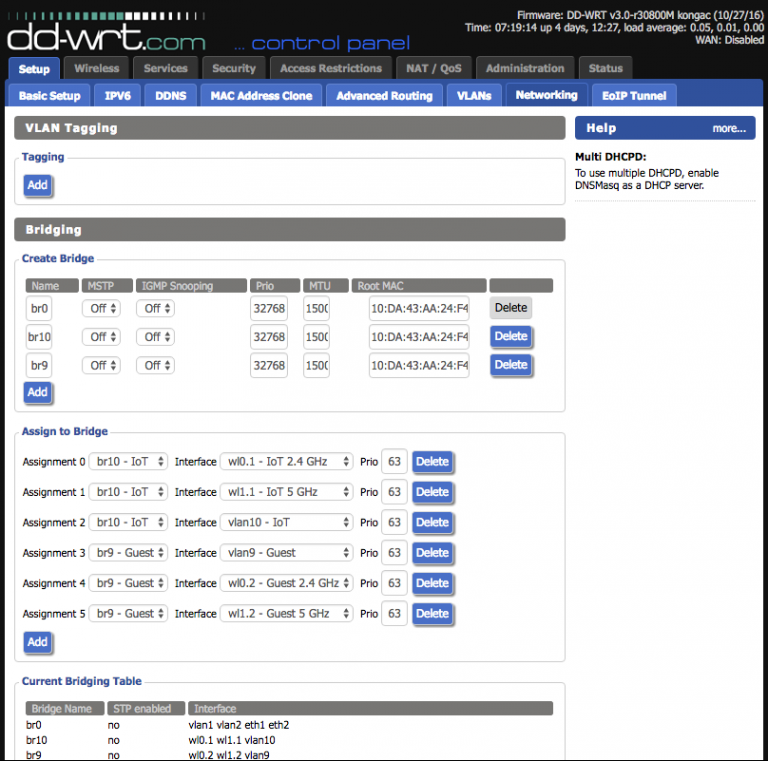
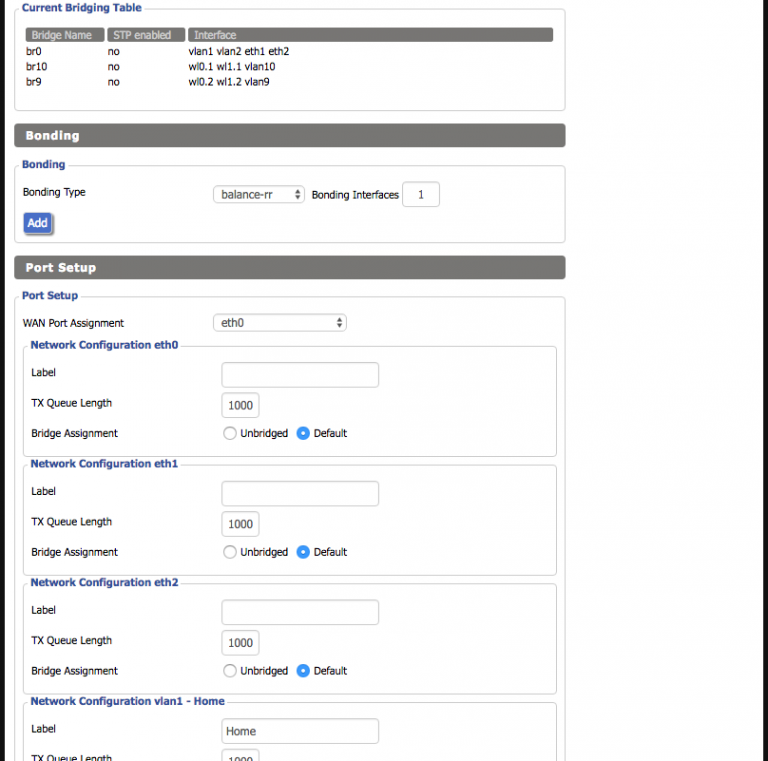
The uplink port on the R7000 needs to be configured to tag the VLANs being used so it can operate correctly as a trunking port. Incidentally, this also lets it create the virtual interfaces necessary for later bridging with the SSIDs (a reboot is usually necessary to get these changes to fully take effect). Unfortunately, while DD-WRT supports VLANs, I soon learned that support is hardware-dependent and somewhat buggy. It has two separate areas where VLAN numbers are configured; the first is under Setup -> VLANs and the second is under Setup -> Networking -> VLAN Tagging:

Officially, which of these to use is heavily chipset-dependent. In practice, I found neither to work fully on the R7000 and instead had to resort to setting some configuration options on the command line. Doing so requires first enabling SSH via the Services tab, then ssh root@your.r7000.ip, and finally entering your password.
There are a few settings necessary to configure the uplink port: port0vlans and vlan#ports (there will be one of these settings per vlan). Each of these has a few special numbers that are explained here. In my network, with the three VLANs 1, 9, and 10, the necessary commands are:
nvram set port0vlans="1 9 10 16 18 19 21"
nvram set vlan1ports="0t 1 2 3 4 5*"
nvram set vlan9ports="0t 5"
nvram set vlan10ports="0t 5"
nvram commit
The DD-WRT web interface typically sets the first of the four settings correctly, but it fails when setting the final three. The t in the vlan#ports settings indicates that the VLAN should be tagged on that port number, but I never was able to get the setting to have that value using the web interface.
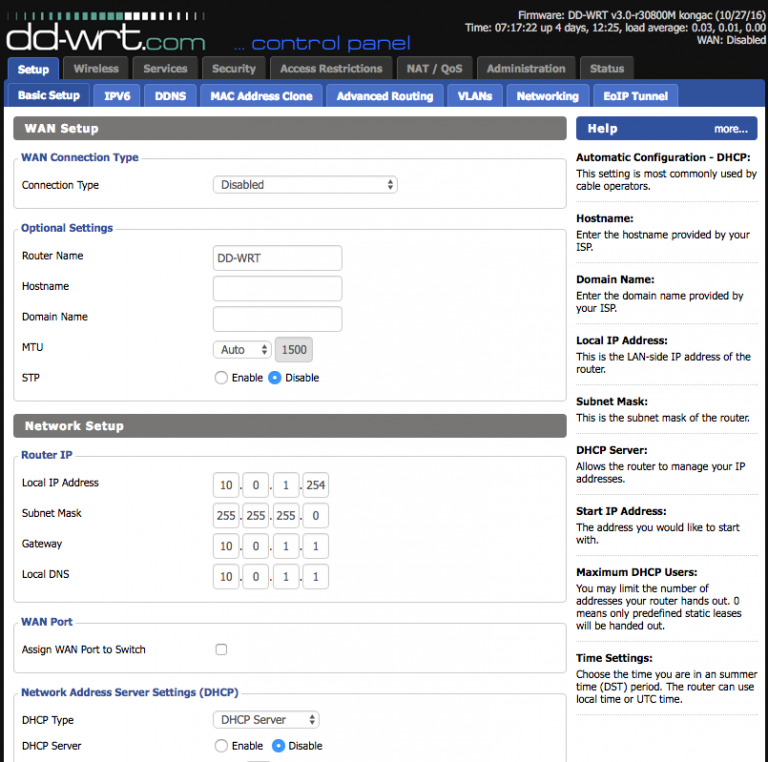
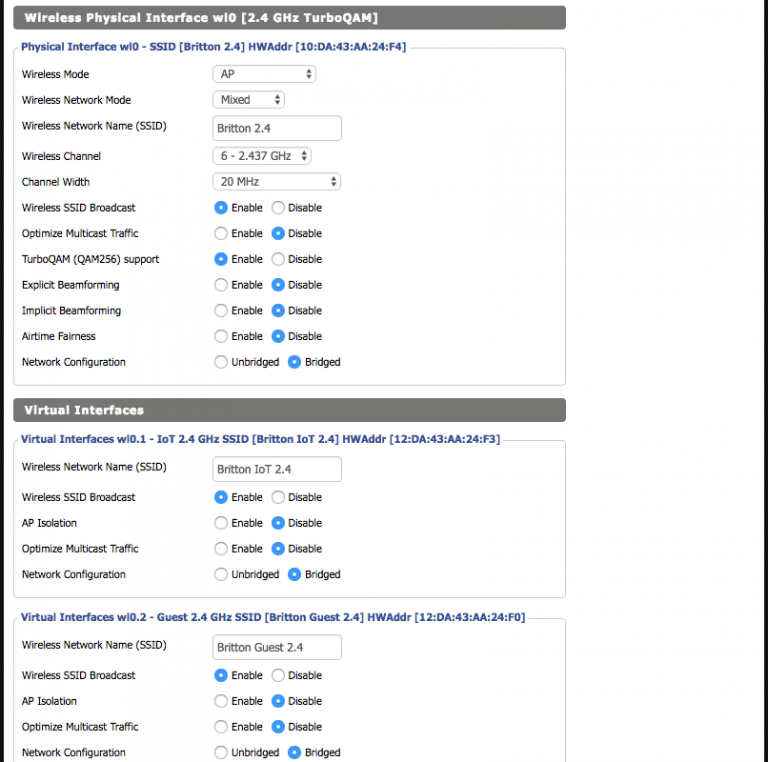
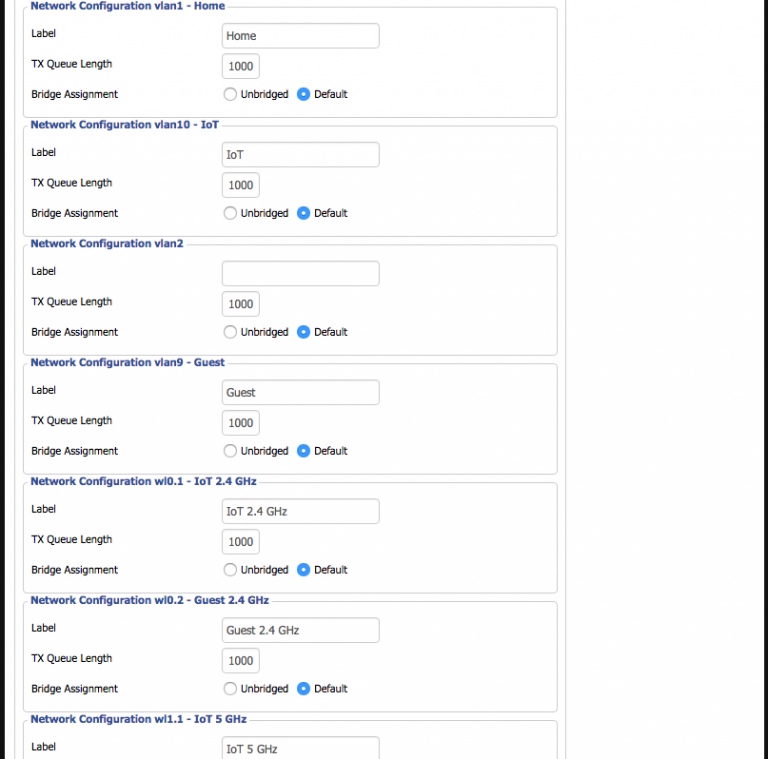
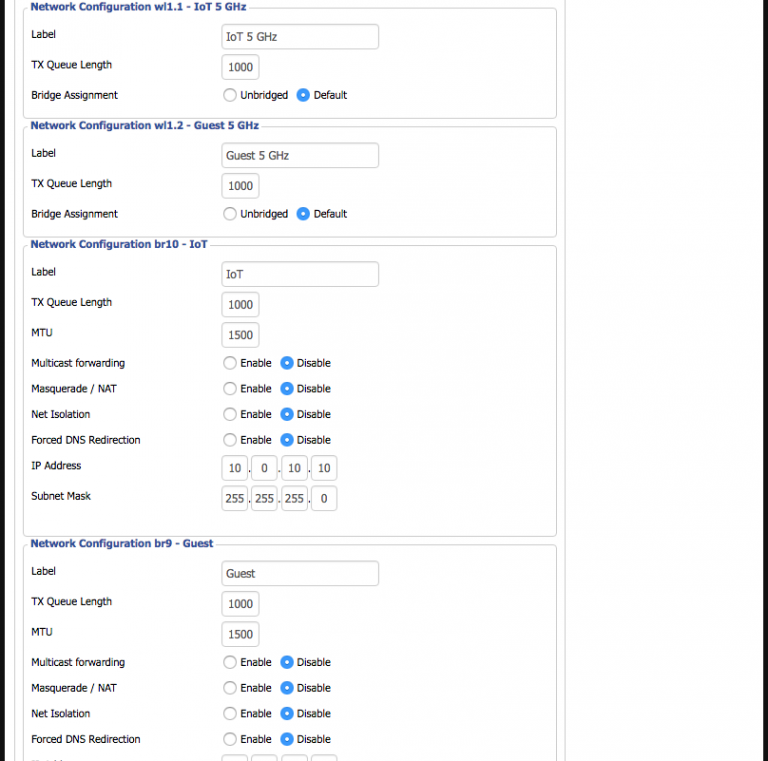
If you’ve managed to get through that without locking yourself out, the rest is pretty easy from here. Screenshots of the settings are the easiest way to see it:
Ubiquiti EdgeRouter PoE
The EdgeRouter was much less trouble to configure. It shipped with a fairly old version of EdgeOS (v1.2.0) though, so it was necessary to update that first. They offer firmware downloads here and instructions for updating here. As of writing this, the current firmware version is v1.9.0.
DHCP
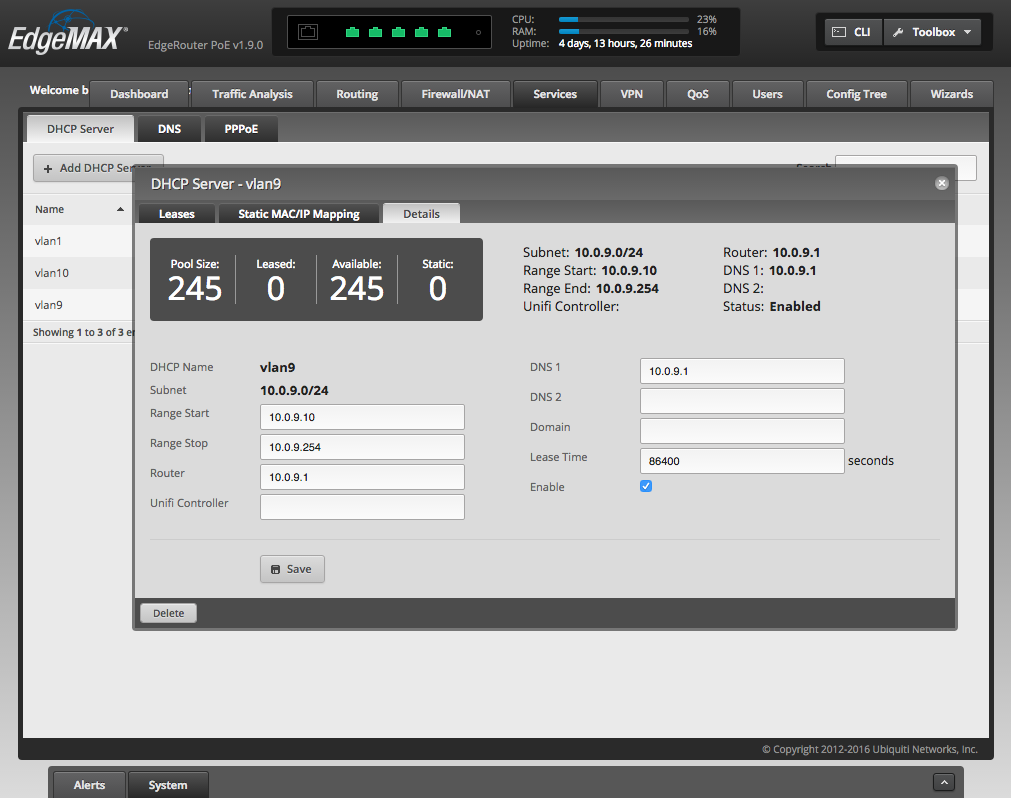
After finishing filling out the system basics (e.g., DNS servers, time zone, etc.) in the System tab at the bottom, I started by adding the DHCP servers. There’s one for each VLAN with a private class C IP range numbered accordingly:
Networks
Next up was configuring the physical ports on the EdgeRouter. eth0 would be the uplink, eth1 the trunking port to the R7000, and the other three would operate in switched mode to feed the unmanaged switch, Mac Mini server, and AirPort Time Capsule. I added the three VLANs to eth1:

Normally the network address for the port/VLAN is set here, which is how EdgeOS determines which DHCP server to send requests to. Because I wanted VLAN1 on multiple ports, eth1.1 could not have an address like eth1.9 and eth1.10. Instead, it needed to be part of an interface bridge that would have the address.
The EdgeRouter supports bridges, but there isn’t exactly a formal interface for building them. They must be created by modifying the config directly, either via the CLI or through the Config Tree tab. I chose the latter.
Start by selecting the bridge item under interfaces. Add a bridge (the name must be in the format br# so I chose br1 for VLAN 1), and then click the refresh button to get it to appear in the tree. Clicking on the new entry in the tree shows the fields to set the IP and network for the bridge.
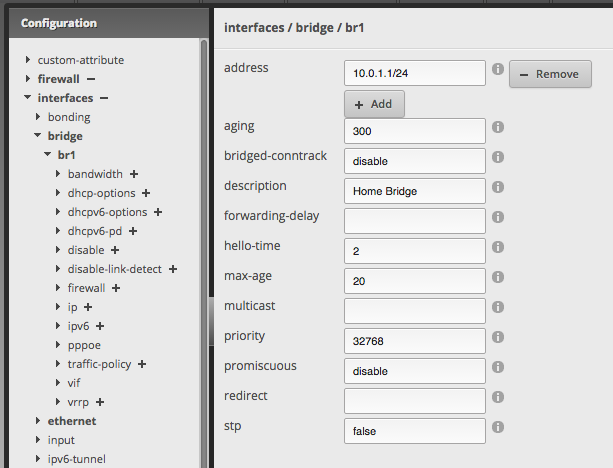
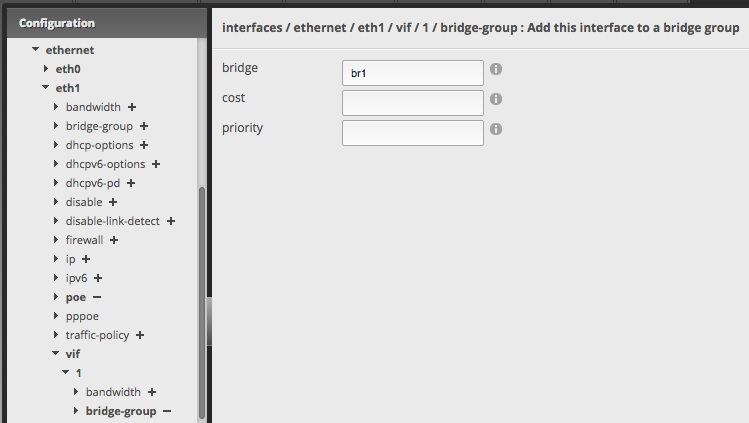
Lastly, the bridged interfaces must be assigned to the new bridge group for it to route traffic. The regular interface is capable of doing this with the physical ports, but for virtual ports like the VLAN 1 tag on my trunking port, that also must be done directly in the config tree.
Firewall
The last major piece of configuration was the firewall. For this I wanted to isolate the IoT and Guest networks so they couldn’t access anything outside of their own subnet and the internet itself, and I wanted to allow the Home network access to everything.
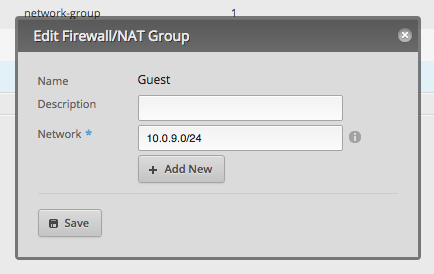
To make some of it easier, I started out creating a firewall group for each subnet so there would be a nice visual label in the rule interface.
Background
Each interface, including the virtual interfaces for VLANs, has three potential sets of firewall rules: IN, OUT, and LOCAL. It’s not immediately obvious which of these to use since the documentation is very lacking in its explanation, but I’ll try to give a better overview. If nothing else, maybe it’ll help some future person searching and trying to find an acceptable explanation like I did.
From the best documentation I could find (grammar mistakes theirs), it defines each of these as follows:
- Applying a firewall ruleset to the IN firewall of an interface affect traffic inbound on that interface but only the traffic forwarded through the router.
- OUT is traffic that has been forwarded through the router and about to leave exit out the interface.
- LOCAL is traffic destined for the router (for example if you wanted to use the web UI on the router you’d need to allow port 443 on LOCAL.
What these actually mean is better depicted visually:

The directions IN, OUT, and LOCAL are all defined from the perspective of the router. OUT is traffic leaving the router while both IN and LOCAL are traffic about to enter the router and differ only by the final destination.
When the destination is the router itself, requests from any device on any network hit the LOCAL firewall. These can include attempts to load the web interface, responses to NTP requests, responses to DNS queries, and anything else where the router itself is the destination device.
Requests from devices to destinations on the other side of the router will first hit the IN firewall before being routed. If they’re routed, they then hit the OUT firewall before being passed on to the next point in the path.
The Rules
The first two policies were for the WAN interface (eth0). For the LOCAL direction, I wanted to only allow pings and traffic for established sessions that originated from the router itself — anything else was unsolicited and should be dropped. In this case it’s easier to post the config tree version of the policy rather than posting a large number of screenshots:
name WAN_local {
    default-action drop
    description ""
    rule 1 {
        action accept
        log disable
        protocol all
        state {
            established enable
            invalid disable
            new disable
            related enable
        }
    }
    rule 2 {
        action accept
        log disable
        protocol icmp
    }
}
For the IN direction:
name WAN_in {
    default-action drop
    description ""
    rule 1 {
        action accept
        log disable
        protocol all
        state {
            established enable
            invalid disable
            new disable
            related enable
        }
    }
}
For the other two sets of policies, the goal was the lock down and isolate Guest and IoT networks while still allowing access from the Home network. Both policies were identical with the exception of which other networks were disallowed.
IN (packets leaving the Guest network):
name Guest_in {
    default-action accept
    description ""
    rule 1 {
        action accept
        description "Allow Established/Related"
        log disable
        protocol all
        state {
            established enable
            invalid disable
            new disable
            related enable
        }
    }
    rule 2 {
        action drop
        description "Block Home"
        destination {
            group {
                network-group Home
            }
        }
        log disable
        protocol all
    }
    rule 3 {
        action drop
        description "Block IoT"
        destination {
            group {
                network-group IoT
            }
        }
        log disable
        protocol all
    }
}
OUT (packets routing to the Guest network):
name Guest_out {
    default-action accept
    description ""
    rule 1 {
        action drop
        log enable
        protocol all
        state {
            established disable
            invalid enable
            new disable
            related disable
        }
    }
}
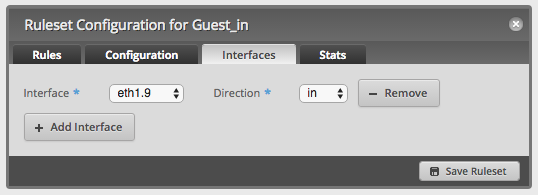
Each policy was assigned to the corresponding interface and direction.
NAT
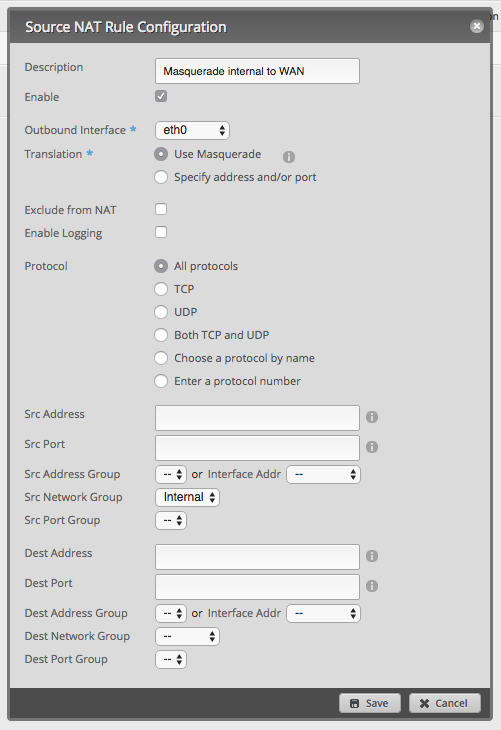
The last bit of setup under the Firewall tab is the Source NAT rule to handle masquerading the internal networks through the WAN interface.
Conclusions
The networks have been up and running now for a few weeks. In that time the EdgeRouter has been flawless, and there has been only a tiny hiccup from the Netgear R7000. Some portion of it froze up, which prevented one laptop from connecting, and it needed power cycling.
Aside from that, everything seems to be working as intended, and I’m more secure than I was before. It was definitely worth the expense, time, and effort to overhaul it all. What is unfortunate is that it takes this amount of effort to adequately insulate myself from IoT devices I don’t fully control and the potentially infected laptops of others. Many consumer-level routers already include built-in support for a dedicated guest network for reasons like the latter, but it may eventually be worthwhile to have a similar IoT network for the former. There’s no sign IoT device security will be improving anytime soon.
