
When planning trips with the trailer where I intend to work some days, internet availability becomes one of the driving factors. In practice, this often limits us to more popular tourist areas or urban campgrounds/RV parks for cellular access, the former of which can be hard to book, and the latter we try to avoid.
Satellite internet can work around this complication, opening up many more potential campsites, but it comes with its own set of limitations. My direct experience is with HughesNet, but I imagine other offerings are similar.
Availability
Not all coverage options are available in every geographic region. The earlier iteration of HughesNet, the Jupiter 1 (EchoStar 17) satellite, covered only certain metropolitan areas. It was not until the transition to Jupiter 2 (EchoStar 19) that it became effectively nationwide for the continental US, but it still has some coverage holes.
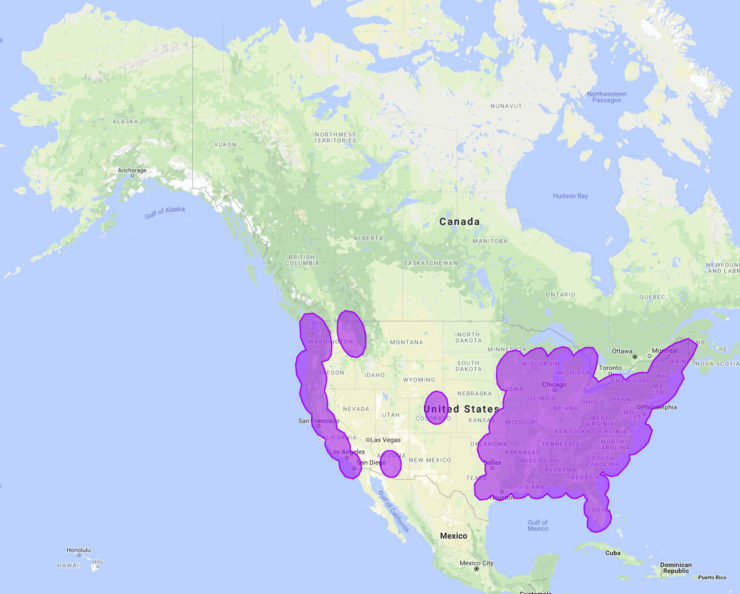
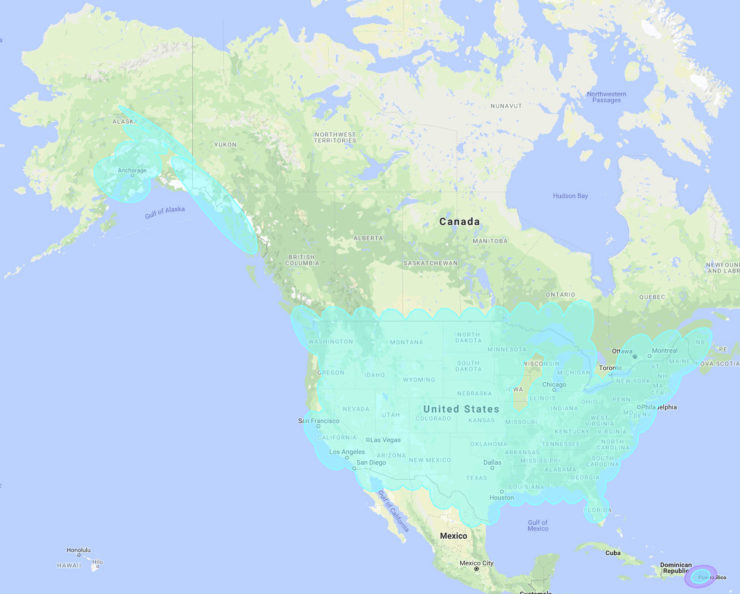
Beyond this, a location must also have an unobstructed line of sight to the satellite. Trees and mountains often fill the more interesting areas to visit, and they can easily block the satellite from view of the dish. The mountains surrounding Lake Wallowa State Park in northeastern Oregon completely block the line of sight to the satellite, for example, and the heights and density of the trees on Washington’s Olympic Peninsula effectively relegate it to only a decent-sized clearing.
In any area with trees, I’ve found no substitute for actually scouting the site to verify satellite availability (rarely practical for a first visit but doable if wanting to return again). Aerial photos don’t reveal the kind of holes you can sneak a satellite beam through, so instead I use an analog sighting compass and inclinometer. I have an app that provides this functionality as well, but I generally avoid using it because phone compasses are often inaccurate.
The Equipment
Unlike home internet, the hardware for satellite internet is not included with the plan. It’s somewhat expensive, too. For everything necessary in a useful mobile setup, the cost delivered was around $1,500 from Barb at mobileinternetsatellite.com. As part of it, she sets up and provisions the account with HughesNet, tests the equipment, and provides a support period as you learn the hardware.
HughesNet does not sell directly to consumer for RV setups, and you’re also required to have a commercial account to enable beam switching (residential home users can’t change beams frequently like an RV requires). You’re required to go through a VAR for it, of which Barb is one, and I’ve been very satisfied with the service.
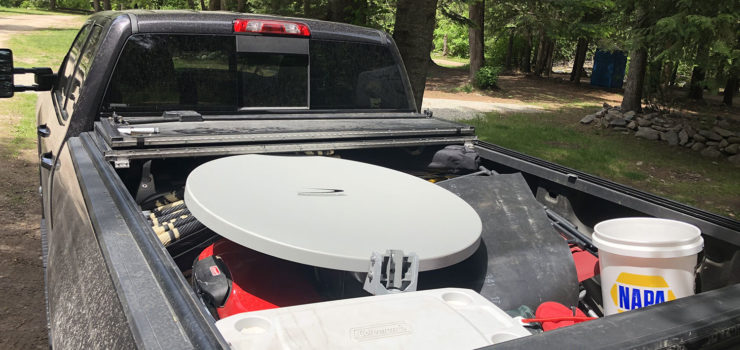
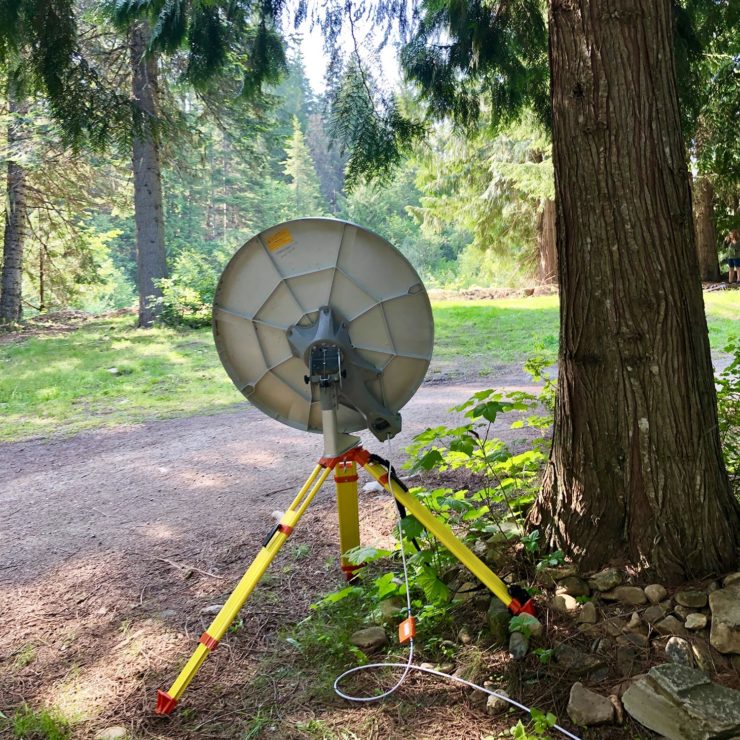
Carrying the equipment is the next hurdle — it is not small. The tripod, cabling, LNB, and small tools are pretty easy to find homes for, but the dish itself is pretty large at just over 3 feet across (I carry it in the truck bed, and I know of another that transports it on the bed in the RV). It’s also around 50 lbs.
Setting Up
Getting everything hooked up starts with assembling the setup where it has direct view of the satellite. Sometimes this can require multiple attempts. The azimuth (which compass direction it’s pointed at) and the elevation (how high it’s pointed) vary based on your latitude and longitude, and the coordinates you eventually lock into usually vary from the estimated ones by a small amount. Where we were most recently, this was roughly 32° elevation and an azimuth of about 139° (almost SE on a compass), but near Bryce National Park it would be slightly above 43° elevation and pointed at an azimuth of around 145°.
I use a combination of tools for this phase. Starting with this app, I obtain the azimuth and elevation to start at. You can also use the administration interface of the HughesNet modem, but I find this much quicker (you will eventually see it in the interface regardless of whether you use it at this stage or not).
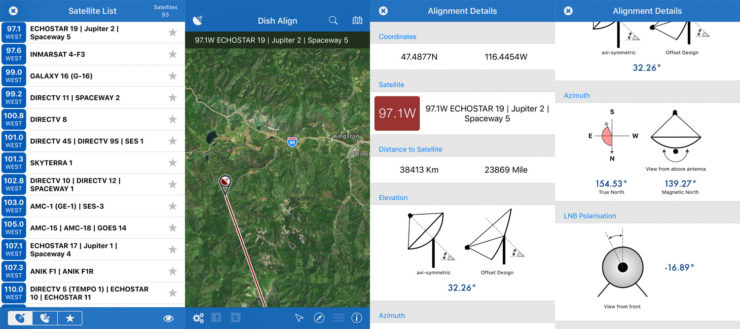
The app starts by prompting you to select the target satellite. In most cases this will be EchoStar 19/Jupiter 2, but the hardware also supports EchoStar 17/Jupiter 1 (this can require switching LNB polarization) if its angles are easier to hit and cover the area you’re in. Once selected, tapping the (i) in the lower right provides the raw numbers for aiming. The only two that matter are the elevation and the azimuth relative to magnetic north. Though other dishes are offered, the best signal currently comes from the big round one, so the rotational angle is irrelevant.
Starting with the tripod, I align one of its legs with the azimuth, adjusting the other legs and overall height as needed to get the top level. From here I assemble the rest, finishing with the dish pointed at the coordinates given by the app.
Dialing In
Because HughesNet intends for their system to be installed by technicians rather than the end users, the next steps in getting set up are somewhat buried. You start by powering up the modem and connecting a computer to it to get at the web interface (its address will be the DHCP gateway address — 192.168.0.1 is the default). From here, you have to log in.
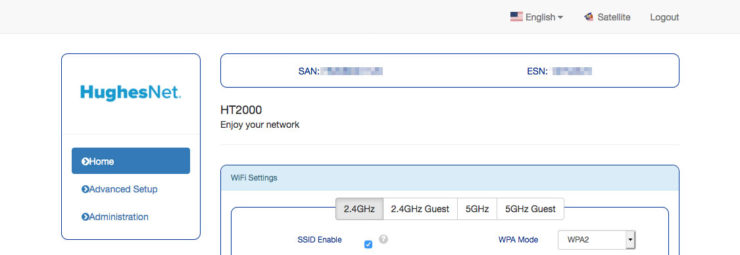
This is the LAN configuration area; clicking on “Satellite” will take you to the Satellite status and configuration section. In the top bar of that page, there is a very faint (i) icon that must be clicked on to reach the installation and diagnostics screen.

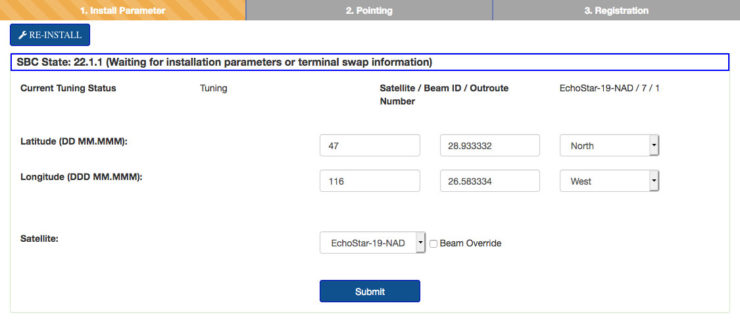
Under Installation, choose to “RE-INSTALL”, and enter the current latitude and longitude. It wants these values in the form of DDD MM.SSS instead of DDD MM SS like a map would give, which requires some math. For the latitude 47° 30‘ 56″ N, you’d enter 47° 30.933 into the HughesNet fields (the latter value is 30 arc minutes + 56 arc seconds / 60).
Once entered, next up is fine-pointing the dish. Using the orange (or yellow for newer hardware) DAPT device, press button 3 when the voltage is shown, then button 3 again after it says logging is done a few seconds later. It will now show the maximum and current satellite signal strength, which will probably be in the range of 15-29 at this point. 29 or lower basically translates to “you’re not pointed at the correct satellite”.
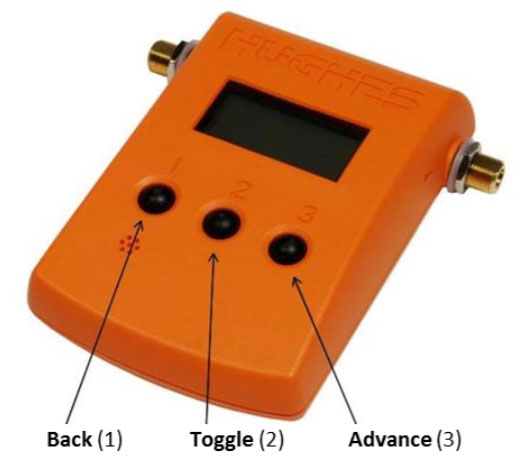
To align the dish with the correct satellite, I slowly sweep from left to right at a fixed elevation. If the signal doesn’t improve, I increase the elevation slightly and do the sweep again, repeating as needed up to a few degrees above the elevation I’m supposed to find the satellite at. If still nothing, I do the same but with lowering the elevation. The readout updates at approximately one second intervals, so sweeping too fast can end up missing the signal.
At some point, provided there is an adequate line of sight, the signal should go above 29. This means it sees a satellite (31 or higher means it’s the correct satellite), and you should focus on that area until you locate the maximum signal point. I’ve successfully used as low as 52 but typically end up at 90+, and, obviously, stronger is better.
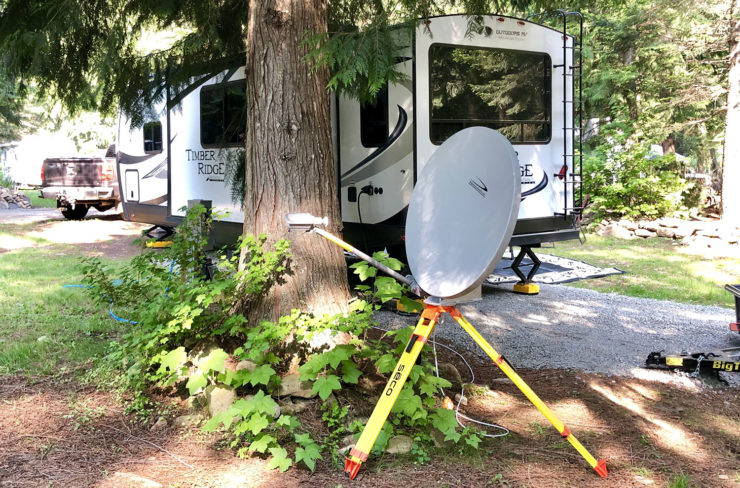
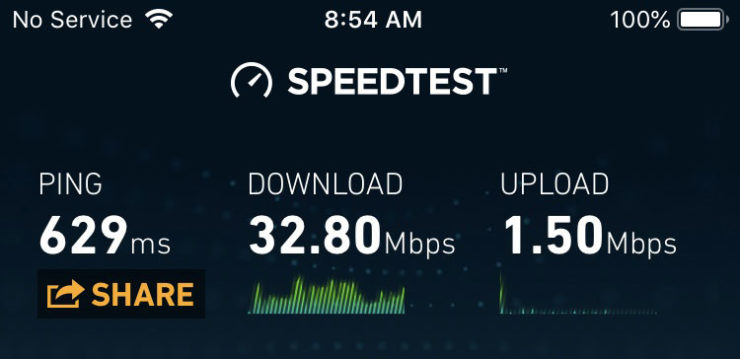
Once pointed (and the hardware tightened), the final step is to lock in the beam. This is done by pressing button 3 on the DAPT, then button 3 when the next prompt comes up so save the pointing state. Press button 2 to complete it. A quick speed test shows it’s working.
Stuck on COMM Startup
If the DAPT is stuck on the COMM Startup, it means it’s still locked on to the old settings. When the modem finishes rebooting after clicking “RE-INSTALL”, it will proceed as normal.
The 29 Signal Problem
The HughesNet software has some kind of bug where it can get stuck on either 29 (more common) or 15 signal strength, and no amount of dish movement will change it. I’ve encountered it once, and the solution that worked for me was to finish installation by locking in the beam (see above) despite not actually being pointed at the satellite and then starting over again.
Rebooting the modem did not have any effect nor did unhooking anything or pointing the dish elsewhere. My theory is that the reinstall clears something with the configuration that a simple reboot can’t.
Alternately, the SBC (Satellite Based Commissioning) configuration file (available from your VAR) may be outdated. This file is used by the modem during the setup process to associate with the correct beam and changes occasionally. Incorrect beam information can prevent finalizing the connection, so it’s important to ensure this is up-to-date while another connection method is available. It is automatically updated as needed while the satellite connection is active.
Latency
EchoStar 19/Jupiter 2 is about 23,000 miles away, varying slightly based on the dish location. That converts to about 0.124 light seconds, and since radio waves travel at the speed of light, it means any packet exchange will have a minimum of almost a half second of latency added (modem -> satellite -> ground (internet) -> satellite -> modem). In practice, I find most real world latencies to be in the 600 ms range and above.
The latency is noticeable in general web use but very usable. It’s even usable for certain VOIP programs (we use TeamSpeak for our larger group calls at my employer but Slack also works), though the delay between speaking and the listener receiving it can take some getting used to — it’s very easy to end up talking over someone.
$ ping 9.9.9.9
PING 9.9.9.9 (9.9.9.9): 56 data bytes
64 bytes from 9.9.9.9: icmp_seq=0 ttl=57 time=638.123 ms
64 bytes from 9.9.9.9: icmp_seq=1 ttl=57 time=638.057 ms
64 bytes from 9.9.9.9: icmp_seq=2 ttl=57 time=638.677 ms
64 bytes from 9.9.9.9: icmp_seq=3 ttl=57 time=639.176 ms
64 bytes from 9.9.9.9: icmp_seq=4 ttl=57 time=636.747 ms
64 bytes from 9.9.9.9: icmp_seq=5 ttl=57 time=639.332 ms
64 bytes from 9.9.9.9: icmp_seq=6 ttl=57 time=643.883 ms
64 bytes from 9.9.9.9: icmp_seq=7 ttl=57 time=638.891 ms
^C
--- 9.9.9.9 ping statistics ---
8 packets transmitted, 8 packets received, 0.0% packet loss
round-trip min/avg/max/stddev = 636.747/639.111/643.883/2.095 ms
Bandwidth Quota
Like a cellular connection, satellite is bandwidth-constrained with a fairly low limit. My plan is a split limit with a 10 GB cap for any usage and an additional 25 GB for usage between the ten-hour period of 8 am – 6 pm daily. Like “unlimited” cellular plans, you’re not disconnected if you use up your quota, but your speed is reduced. HughesNet advertises the reduced speeds being in the range of 1-3 Mbps, though I cannot verify this having not yet hit that limit.
Also like cellular, this connection should not be used for streaming video. That uses at least 0.3 GB per hour at 480p up to 3 GB per hour at 1080p, and you can use most or all of your higher speed quota in a single day quite easily. Video entertainment when not on a land-based is best served by either discs and a player, previously-downloaded content, or something like my RV media center.
Rain Fade
HughesNet operates on the Ka microwave band. At such high frequencies (26.5-40 GHz), rain and humidity can create enough signal attenuation to severely degrade the connection. There is no solution on the dish’s end aside from waiting it out — it’s a trade-off from the higher bandwidth Ka band offers over the older Ku band.
HCS (High-Capacity Satellite) technology operating in Ka-band offers significant advantages over conventional satellite networks operating in Ku-band and lower frequencies. More bandwidth is available at the higher Ka-band frequencies. Ka-band antennas experience higher gain than comparably sized antennas operating at lower frequencies. Finally, Ka-band offers a new spectral environment, enabling deployment of new, advanced satellite system architectures with new features. HCS satellites in operation today, such as ViaSat-1 and KA-SAT, offer much higher data capacity than conventional satellite systems, enabling a host of new services as well as a superior user experience on existing services.
There is a downside to using Ka-band though; adverse weather conditions impact Ka-band more than at lower frequencies.
Conclusions
I like having satellite internet as an option, but it’s definitely not my first choice for connectivity. Usable Wi-Fi, as elusive as Sasquatch, is at the top of the list with cellular as a close second. The size of the equipment for transport, the 10-15 minute setup, and the latency all push satellite into a distant third. Still, because it opens up so many more locations when internet access is a requirement, it’s worth having in my situation.
At close to $90/month, it costs more than my cellular options combined. HughesNet does allow subscribers to temporarily suspend their accounts when not using them, reducing the monthly rate to $20/month for the duration. Of course, this applies to whole months, and using any part of the month means the full rate applies.
It is most definitely not for anyone shy around tech. As I mentioned above, the HughesNet system is intended to be installed by a technician and never touched again. By using it outside of that scenario, you must become the technician. All troubleshooting must be done by you, often in locations that have no other internet options available to search for solutions with.
Lastly, while reasonably low power use overall, it does run on 120VAC currently, and I probably won’t try to change that. The power adapter provides power both for the modem and LNB, and it does so at two different voltages using a multi-pin plug. Because of that, it would be overly difficult to create any kind of DC power adapter that doesn’t consume significantly more space. I’m willing to accept the inefficiency of powering it through the inverter.
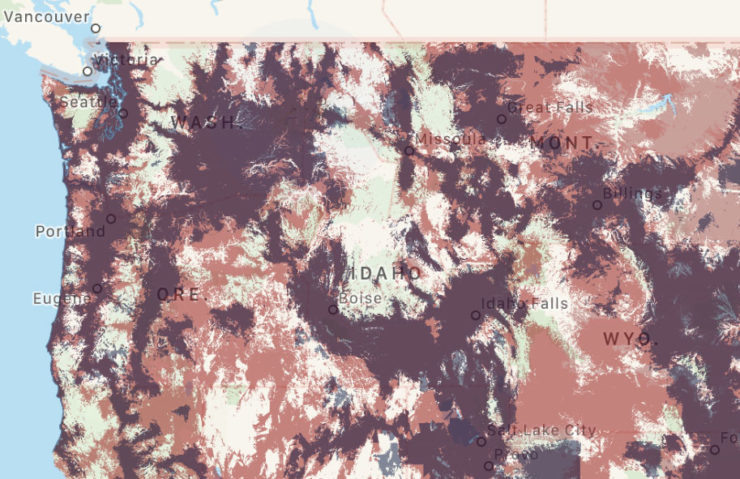
There are a lot of great destinations in the uncolored areas where satellite is the only means of connection.